 How to reduce back pain with yoga?
Yoga is an excellent way of relieving lower back pain as it not only stretches the lower back muscles to help ease the pain but also contributes to strengthen certain muscles in the lower back, which could help prevent further lower back pain in the future. Certain yoga poses are better for lower back pain than others. Here are five most simple yoga exercises to help relieve lower back pain
 Yoga Pose 1 – Cat/Cow Pose

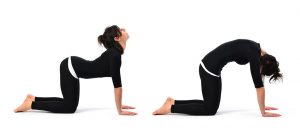
Cat/Cow Pose is a very easy yoga position to get into and is an excellent exercise to help with lower back pain. These two yoga poses are interlinked and often used in conjunction with each to create a single yoga pose.
Cow Pose – How to do it
1.Begin in a tabletop position on your hands and knees, making sure your knees are set at 90 degrees to your back and directly below hips. Your wrists should be directly below your shoulders and in line with your elbows, which are perpendicular to the floor. Place your head in a neutral position to ensure your spine is straight and look directly down at the floor.
2. Take a long, deep breath and lift your pelvis and coccyx (sitting bones) towards the ceiling. Push your chest out and towards the floor. Allow your belly to sink towards the ground as your pelvis and chest move upwards. Life your head at the same as your shoulders and look directly ahead of you.
3. Exhale slowly and steadily, drop pelvis and chest and raise your belly to return to the tabletop position. Repeat this 10 – 20 times slowly, making sure to inhale and exhale slowly and deeply.
Cat Pose – How to do it
1. Begin in a tabletop position on your hands and knees, making sure your knees are set at 90 degrees to your back and directly below hips. Your wrists should be directly below your shoulders and in line with your elbows, which are perpendicular to the floor. Place your head in a neutral position to ensure your spine is straight and look directly down at the floor.
2. Exhale slowly and deeply and round your spine up towards the ceiling, stretching your shoulders and your lower back. This pose is excellent for lower back relief. Make sure to keep your hands and knees on the floor at all times, and release your head from its neutral position so it drops towards the floor. Let your head hang in a relaxed position – don’t force your chin to your chest.
3. Inhale slowly and deeply and lower your spine slowly back into the neutral position, lifting your head and keeping your hands and knees on the floor.
The Cow and Cat Pose can be used together for a gentle flowing, vinyasa and as an excellent remedy for lower back pain.
Benefits
- Stretches the neck, back, lower back and torso and provide relief for lower back pain.
- Provides a gentle muscle massage to the spine, lower back, and belly organs.
Precautions
- To prevent neck injury, it is paramount to keep the head in line with the torso when performing these poses. When dropping the head during the Cat Pose, let it fall and rise again gently.
Beginners tip
- Beginners might have difficulty rounding the very top of the back in the Cat Pose. If so, get someone to place their hand lightly between the shoulders. This will help to activate the area and be able to feel which muscles need to be stretched.
 Yoga Pose 2 – Upward/Downward Facing Dog

How to do it
1. Begin in a tabletop position on your hands and knees, making sure your knees are set at 90 degrees to your back and directly below hips. Your wrists should be directly below your shoulders and in line with your elbows, which are perpendicular to the floor. Place your head in a neutral position to ensure your spine is straight and look directly down at the floor.
2. Spread the fingers so that they are parallel to each other and turn the toes under.
3. Exhale deeply and lift the knees off the floor, slowly straightening the knees and lifting the heels off the floor. Tuck the tailbone down towards the pubis, lengthening it away from the back of the pelvis.
4. On the exhalation, push the thighs backwards and stretch the heels downwards until they touch the floor or are near to the floor. Roll the thighs slightly inwards and firm the upper thighs to hold the pose – be sure NOT to lock the knees.
5. Press the bases of the index fingers actively into the floor and lift the inner arms from the wrists to the tops of the shoulders. Shoulder blades need to be firmly pressed against the back, widened and drawn toward the tailbone. The head needs to remain between the upper arms and should not hang down.
Variations
- For an extra challenge, take a deep breath and raise the right leg parallel to the line of the torso and hold for 30 seconds. The hips should be kept the level at all times by pressing through the heel. Release on the exhalation and repeat on the other side.
Benefits
- Stretches the shoulders, calves, arches, hamstrings, and hands.
- Strengthens the arms and legs.
- Relieves stress and energizes the body.
- Relieves insomnia, headaches, lower back pain, and fatigue.
Precautions
- This pose should not be performed with suffering from diarrhoea, carpal tunnel syndrome, late-term pregnancy, high blood pressure or headaches.
Beginners tip
- Beginners might have some difficulty releasing and opening the shoulders in this pose. In this case, use a pair of blocks to raise the hands off the floor.
 Yoga Pose 3 – Extended Triangle

How to do it
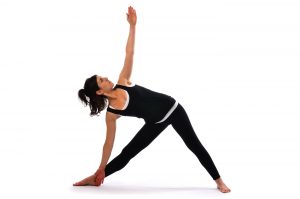
1. Begin this pose by standing in the Tadasana position with the feet between three and four feet apart from each. On a deep exhalation, raise the arms so that they are in straight line from the shoulder to the fingertip and parallel to the floor with the shoulder blades down, and the palm facing down.
2. The left foot should be turned slightly inwards and towards the right while the right foot should be placed at 90 degrees to the left foot. The right heel should be aligned with the left heel, so that both feet are in a straight line, one behind each other. Squeeze the knees, pulling the thigh muscles upwards, turning the right thigh outwards.
3. Exhale and extend the torso over the right leg, bending from the hip and placing the fingertips of the right hand on the top of the right foot. The outer heel needs to be pressed firmly into the floor to anchor this movement before rotating the torso to the left, keeping the two sides of the body and the legs equal length.
4. Stretch the left arm up over the head and towards the ceiling, keeping the arm straight and in line with the tops of the shoulders. The head should remain in a neutral position, with the eyes looking up at the left hand. Stay in this pose for at least 30 seconds, before inhaling deeply to come up, pressing the back heel into the floor and reaching the right arm up over the head. Reverse the feet to repeat the exercise the other way round.
Variations
- Instead of reaching for the ceiling with the arm, stretch it over the back of the ear on the same side so that it is parallel to the floor.
Benefits
- Stretches hips, thighs, groins, knees, hamstrings and calves, as well as shoulders chest and spine.
- Strengthens the ankles, knee, and thighs.
- Stimulates the abdominal organs to help improve digestion and relieve symptoms of menopause.
- Relieves lower back pain and general backache.
Precautions
- If neck problems are presents, do not turn the head towards the ceiling, but keep looking straight ahead, maintaining a neutral position.
- Not advisable to perform this pose if suffering from diarrhoea, headaches, heart conditions or high or low blood pressure.
Beginners tip
- Use a wall to brace the feet if feeling unsteady in the pose.
 Yoga Pose 4 – Bow Pose

So called for looking like an archer’s bow, the Bow Pose is an excellent pose for stretching the lower back and relieving lower back pain.
How to do it
1. Begin this pose by lying on the belly with the hands placed alongside the torso and the palms facing up. Exhale slowly and deeply and bend the knees upwards with the heels as close to the buttocks as possible. Reach back and take hold of the ankles, ensuring the knees are not wider than the hips.
2. Inhale deeply and lift the heels away from the buttocks, and at the same time, lift the thighs off the floor. Be sure to keep the muscles in the back soft and push the tailbone down towards the floor and lift the heels and thighs as high as possible. Press the shoulder blades against the back, draw the tops of the shoulders away from the ears and open the chest. Keep facing forward and breathe into the back of the torso – be sure to not stop breathing.
Variations
- A more challenging variation includes dipping the shoulder to the floor, pulling the left foot to the right and rolling over. Rolling onto the side can be practiced without holding the ankles at first and then trying by holding the ankles.
Benefits
- Stretches the entire front of the body, as well as the back muscles, thighs, groin, and deep hip flexors (psoas).
- Stimulates the organs of the abdomen and neck and improves posture.
Precautions
- Do not perform this pose is suffering from high or low blood pressure, migraines, insomnia, neck or lower back injuries.
Beginners tip
- Beginners could find it difficult to lift the thighs off the floor. Legs can be given an upward boost by placing a rolled-up blanket beneath the thighs.
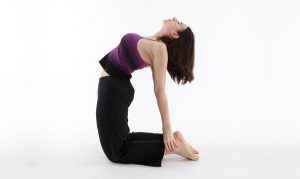 Yoga Pose 5 – Camel Pose

How to do it
1. Begin this pose by kneeling on the floor with the knees in line with the hips and the thighs perpendicular to the floor. The hips should be rotated slightly inwards, but the buttocks should not be hardened – keep them soft. Keep the outer hips as soft as possible and press the shins and the tops of the feet firmly into the floor.
2. Place the hands on the back of the pelvis with the base of the palms of the upper part of the buttocks with the fingers pointing downwards. Press the pelvis firmly to spread the back pelvis to lengthen it down the tail bone. Push the tailbone forward towards the pubis. Take a deep breath and lift the chest.
3. Lean back keeping the hands on the pelvis and the head up. Tilt the thighs back slightly from their perpendicular position and twist the torso slightly to place the right hand on the right foot. Then press your thighs back to perpendicular, turn your mid-section back to neutral, and touch the second hand to its foot.
4. Press the palms of the hands firmly against the soles or heels of the foot – whichever is more comfortable – and make sure to release the front ribs so they aren’t protruding sharply. Turn the arms outwards without squeezing the shoulder blades together and keep the neck in a neutral position. Do not strain the neck or harden the throat.
Benefits
- Stretches the entire front of the body, as well as the back muscles, thighs, groin, and deep hip flexors (psoas).
- Stimulates the organs of the abdomen and neck and improves posture.
Precautions
- Do not perform this pose is suffering from high or low blood pressure, migraines, insomnia, neck or lower back injuries.
Beginners tip
- This is an awkward position for beginners, who might not be able to touch their feet without straining the back. Position blocks outside each heel and use them to place the hands on. Follow the instructions and then move the hands across from the blocks to the heels.


")


